Introduction
Kali Linux ek powerful Debian-based Linux distribution hai jo digital forensics aur penetration testing ke liye design kiya gaya hai. Isme pehle se hi bohot saare tools installed hote hain, jo ethical hackers aur security professionals ke liye isse ek favorite banata hai. Ye ek open-source operating system hai jo security professionals aur enthusiasts ke liye specially crafted tools aur resources provide karta hai.
Ye guide aapko Kali Linux start karne me madad karegi, jisme installation, basic usage aur intermediate techniques cover hongi.
Kali Linux ke Features
Comprehensive Toolkit – Kali Linux me pehle se hi bohot saare security tools installed hote hain jo penetration testing aur ethical hacking ke har aspect ko cover karte hain. Ye cybersecurity professionals ke liye ek one-stop solution hai.
Open Source & Free – Kali Linux ek open-source distribution hai, iska matlab users ise freely modify, distribute aur develop kar sakte hain GNU General Public License ke under.
Frequent Updates – Kali Linux ko regular updates milte rehte hain, jo ensure karta hai ki security experts ke paas latest tools aur technologies ho taaki wo naye cybersecurity vulnerabilities ko assess aur address kar sakein.
Getting Started with Kali Linux
Requirements
Kali Linux install karne ke liye aapko ye cheezein chahiye hongi:
- Ek computer ya Virtual Machine (VM) jisme aap Kali Linux install kar sakein.
- Kam se kam 20 GB disk space hona chahiye.
- Kam se kam 2 GB RAM (lekin 4 GB recommended hai).
- Stable internet connection taaki updates aur tools install kar sakein.
Installation Methods
Kali Linux ko install aur run karne ke kai tareeke hain:
A. Primary OS Installation
Is method me aap Kali Linux ko apne computer ka main operating system bana sakte hain. Ye method best performance aur hardware resources ka full access provide karta hai.
B. Virtual Machine Installation
Agar aap apne existing OS ke saath Kali Linux chalana chahte hain, to Virtual Machine (VM) ka use kar sakte hain. VMware ya VirtualBox jese software ke through aap Kali Linux ko install aur run kar sakte hain. Ye method testing aur development ke liye best hai.
C. Live Boot
Agar aap bina installation ke hi Kali Linux run karna chahte hain, to USB stick se Live Boot kar sakte hain. Ye method quick assessments aur temporary use ke liye kaafi useful hai.
Kali Linux ke Pre-Installed Tools
Kali Linux me 600+ pre-installed penetration testing applications milti hain. Har program ek unique adaptability ke saath aata hai. Ye tools different categories me divided hain, jo users ke liye navigation easy banata hai:
- Hardware Hacking
- Information Gathering
- Wireless Attacks
- Vulnerability Analysis
- Web Applications
- Exploitation Tools
- Password Attacks
- Forensics Tools
- Maintaining Access
- Reporting Tools
- Sniffing & Spoofing
- Reverse Engineering
Installation Steps
Step 1: Download Kali Linux
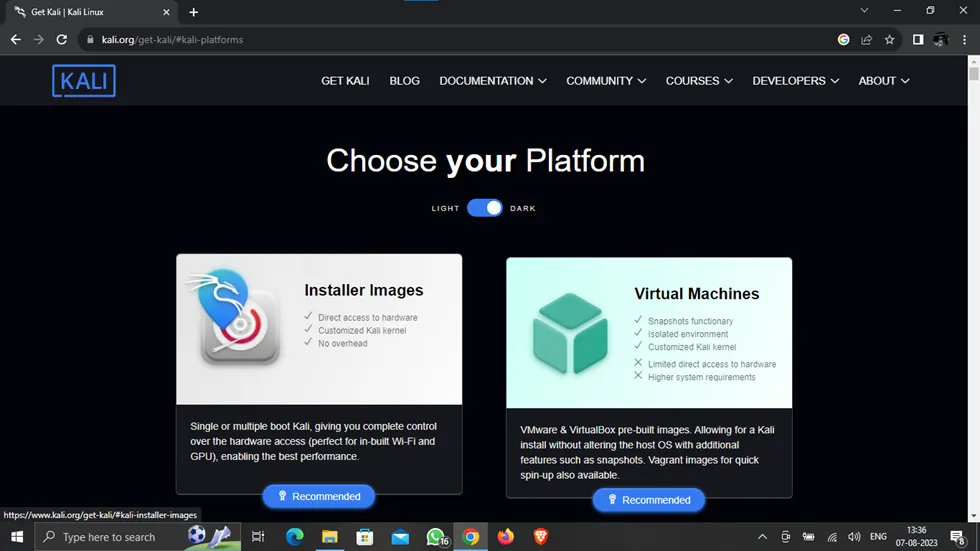
Sabse pehle Kali Linux ki official website par jaakar download page open karein. Yaha aapko different platform options milenge jisme aap install kar sakte hain, jaise:
- Virtual Machines (VMware/VirtualBox) ke liye ISO ya pre-built VM image download kar sakte hain.
- Bootable USB Drive ke liye Kali Linux ISO file download karein.
Website Link: https://www.kali.org/get-kali/
Kali Linux install karne se pehle ensure karein ki aapke system me upar diye gaye proper system requirements fulfill ho rahe hain.
Apne system ke liye sahi version select karein. Agar aap pre-configured Virtual Machine (VM) image download kar rahe hain, to checksum verify karne ka process bhi same hi hoga.
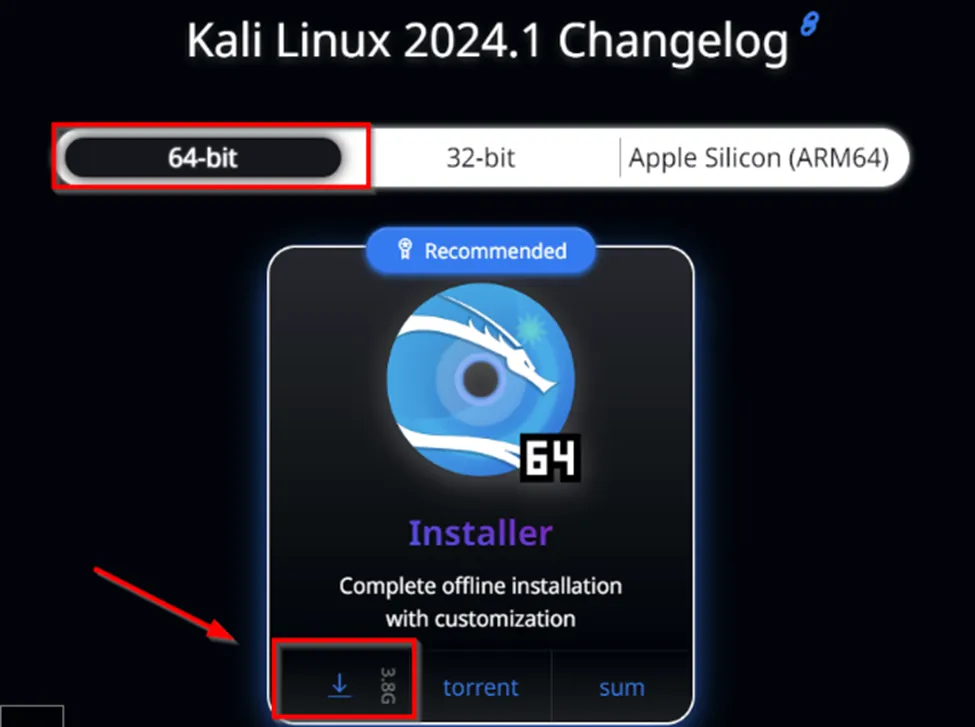
Aapke internet connection ki speed ke upar depend karega ki Kali Linux download hone me kitna time lagega.
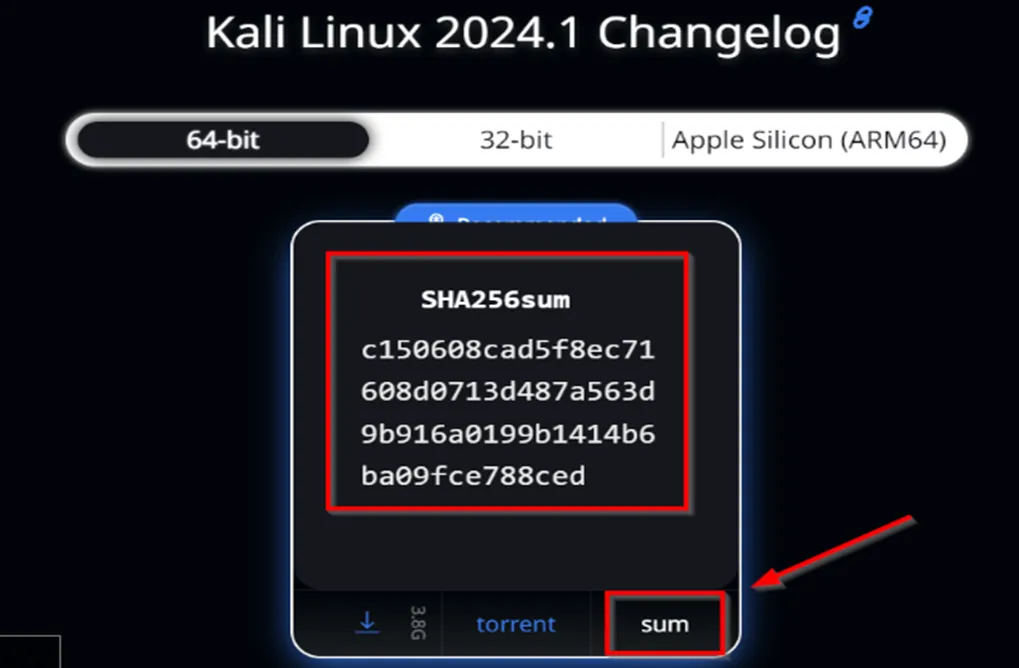
Validate Checksums
Kali Linux run karne se pehle file ka hash verify karna zaroori hai taaki confirm ho sake ki download hui file corrupt ya modified nahi hai.
- Download page par jaakar “sum” option select karein.
- Waha aapko ISO file ka SHA256 hash milega.
- Is hash ko apni downloaded file ke hash se match karein taaki ensure ho ki file sahi hai.
Windows par, jahan aapne Kali Linux file download ki hai, waha navigate karein. Downloaded file par right-click karein, context menu me “CRC SHA” option select karein, aur phir “SHA-256” choose karein.
Isse file ka SHA256 checksum calculate hone lagega.

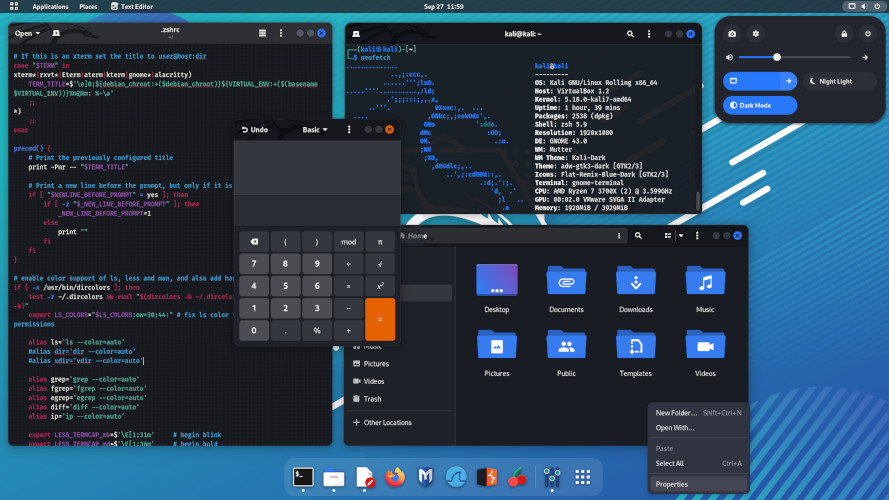
Ek powerful aur robust tool jaise Nmap ka ek downside yeh hai ki itne saare commands yaad rakhna mushkil hota hai. Kaafi experienced log bhi Nmap ka pura fayda nahi utha pate kyunki uske saare flags yaad rakhna ek challenge ban jata hai.
Humne ek Nmap cheat sheet tayar ki hai jo tumhe yeh zabardast tool master karne me madad karegi. Chahe tum ise Nmap ke options yaad rakhne ke liye use karo, ek quick reference ke taur par rakho, ya CEH/Pentest+ exam ke liye study sheet ki tarah istemal karo, yeh tumhe Nmap pro banane me zaroor madad karegi.
Target Specification
| SWITCH | EXAMPLE | DESCRIPTION |
|---|---|---|
| nmap 192.168.1.1 | Scan ek single IP | |
| nmap 192.168.1.1 192.168.2.1 | Specific IPs scan karo | |
| nmap 192.168.1.1-254 | Ek range scan karo | |
| nmap scanme.nmap.org | Ek domain scan karo | |
| nmap 192.168.1.0/24 | CIDR notation ka use karke scan karo | |
| -iL | nmap -iL targets.txt | Ek file se targets scan karo |
| -iR | nmap -iR 100 | 100 random hosts scan karo |
| -exclude | nmap -exclude 192.168.1.1 | Listed hosts ko exclude karo |
Ek penetration tester ke liye Nmap ka sahi istemal bahut zaroori hai. Niche Nmap ke most important commands ko real-world pentesting scenarios ke sath explain kiya gaya hai. 🚀
🔍 1. Host Discovery (Network me kon kon se devices active hain?)
💡 Scenario: Tum ek corporate network par ho aur tumhe yeh dekhna hai ki network me kaunse active devices hain, bina unke ports scan kiye.
🔹 Command:
nmap 192.168.1.1/24 -sn
🔹 Explanation:
✅ Yeh command port scan ko disable kar ke sirf alive hosts ko detect karega.
✅ Agar tum chahte ho ki ports scan na ho, sirf devices detect ho to -sn flag use karo.
📌 2. TCP SYN Ping Scan (Firewall ke peeche bhi hosts detect karo)
💡 Scenario: Kuch firewall protected hosts ICMP ping requests block kar rahe hain. Tum TCP SYN scan ka use karke active hosts dhoondhna chahte ho.
🔹 Command:
nmap -PS22,80,443 192.168.1.1/24
🔹 Explanation:
✅ Yeh port 22 (SSH), 80 (HTTP), aur 443 (HTTPS) par TCP SYN packets bhej kar dekh raha hai ki host alive hai ya nahi.
✅ Firewall ICMP ping block bhi kare tab bhi yeh scan chalega.
🔥 3. Full Port Scan (Sabhi ports check karo)
💡 Scenario: Ek company ke server par tumhe sabhi open ports dekhne hain. Ho sakta hai ki kuch uncommon services hidden hoon.
🔹 Command:
nmap -p- 192.168.1.1
🔹 Explanation:
✅ -p- flag 1 se 65535 tak ke saare ports ko scan karega.
✅ Default scan sirf common 1000 ports scan karta hai, lekin yeh sab kuch uncover karega.
🛠 4. Service aur Version Detection (Kaunse services chal rahi hain?)
💡 Scenario: Tum ek live server scan kar rahe ho aur tumhe yeh dekhna hai ki kaunse services chal rahi hain aur unki versions kya hain.
🔹 Command:
nmap -sV 192.168.1.1
🔹 Explanation:
✅ Yeh scan running services (e.g., Apache, MySQL) aur unka version number dikhayega.
✅ Agar kisi service ka version outdated hai, to tum vulnerability exploitation ke liye plan bana sakte ho.
🎯 5. OS Detection (Target ka Operating System detect karo)
💡 Scenario: Tumhe ek server ka operating system (Windows/Linux) detect karna hai.
🔹 Command:
nmap -O 192.168.1.1
🔹 Explanation:
✅ Yeh command TCP/IP fingerprinting use karke OS guess karega.
✅ Agar system ke ports filtered hain, to yeh OS detection accurate nahi hoga.
⚡ 6. Aggressive Scan (Sab kuch ek hi command me)
💡 Scenario: Tum ek CTF challenge ya pentesting assessment kar rahe ho aur tumhe jaldi se zyada se zyada information chahiye.
🔹 Command:
nmap -A 192.168.1.1
🔹 Explanation:
✅ -A OS detection, version detection, traceroute, aur default NSE scripts ko ek saath enable karta hai.
✅ Yeh ek noisy scan hai, agar stealth scan chahiye to mat use karo.
🛡 7. Firewall IDS Bypass (Stealth Mode Scan)
💡 Scenario: Tumhe pata hai ki IDS (Intrusion Detection System) ya Firewall installed hai. Tum stealthy scan karna chahte ho bina alert generate kiye.
🔹 Command:
nmap -sS -T2 -f 192.168.1.1
🔹 Explanation:
✅ -sS = Stealth scan (Half-open SYN scan)
✅ -T2 = Slow scan (Polite mode) to avoid detection
✅ -f = Packet fragmentation se firewall evasion
🚀 8. Bruteforce DNS Subdomains (Hidden Services Find Karo)
💡 Scenario: Tum company.com ka pentest kar rahe ho aur dekhna chahte ho ki uske hidden subdomains kaun kaun se hain.
🔹 Command:
nmap -script=dns-brute company.com
🔹 Explanation:
✅ Yeh script brute force karega subdomains jaise ki:
admin.company.com
mail.company.com
vpn.company.com
✅ Hidden servers ka discovery karne ke liye useful hai.
🕵️♂️ 9. SMB Vulnerabilities Check (Windows Server me SMB Bugs dhoondo)
💡 Scenario: Tum ek Windows server scan kar rahe ho aur tumhe SMB vulnerabilities dhoondhni hain jaise ki EternalBlue (MS17-010).
🔹 Command:
nmap -p445 –script smb-vuln* 192.168.1.1
🔹 Explanation:
✅ Yeh SMB (Server Message Block) ki sabhi known vulnerabilities check karega.
✅ Agar server Windows 7/Server 2008 hai aur vulnerable hai, to tum EternalBlue exploit use kar sakte ho.
🕵️ 10. Whois Lookup (Domain ki Full Info Nikalo)
💡 Scenario: Tumhe kisi domain ki full Whois information chahiye, jaise ki IP, Registrant Name, DNS Info, Expiry Date, etc.
🔹 Command:
nmap -script whois* google.com
🔹 Explanation:
✅ Yeh whois database se details fetch karega.
✅ Useful for reconnaissance phase me.
📂 11. Save Scan Results (Reports Generate Karo)
💡 Scenario: Tum pentest kar rahe ho aur tumhe scan results save karne hain taaki baad me analyze kar sako.
🔹 Command:
nmap -sV -oA scan_results 192.168.1.1
🔹 Explanation:
✅ Yeh scan results 3 formats me save karega:
Normal (.nmap)
Grepable (.gnmap)
XML (.xml)
✅ Tum xsltproc scan_results.xml -o report.html command se ek HTML report bhi bana sakte ho.
🔚 Conclusion
Ek penetration tester ke liye Nmap sabse powerful tool hai. Agar tumhse koi CTF ya real-world pentesting me poochhe ki tum network aur service discovery kaise karoge, to yeh commands tumhe master hacker bana sakti hain! 🚀🔥
📜 Nmap Scripting Engine (NSE) ke Bare Mein
🛠 Nmap Scripts Kya Hain?
Nmap NSE (Nmap Scripting Engine) ka use karta hai jisme pre-written Lua scripts hote hain jo network scanning, vulnerability assessment, exploitation, brute forcing, etc. me madad karte hain.
👉 Scripts ka path location:
Ya phir Windows par:
Nmap scripts ke 4 main categories hain:
Discovery Scripts – Network me hosts, services, DNS records detect karne ke liye.
Vulnerability Scripts – Common vulnerabilities jaise SMB, SQLi, XSS detect karne ke liye.
Exploitation Scripts – Exploits ko automate karne ke liye.
Brute Force Scripts – Weak passwords find karne ke liye.
📌 1. Default Scripts Run Karna
💡 Scenario: Tumhe kisi target ka basic scan karna hai jo safest scripts use kare.
🔹 Command:
nmap -sC 192.168.1.1
🔹 Explanation:
✅ -sC default scripts ko enable karega.
✅ Yeh banner grabbing, DNS lookup, HTTP info, SMB info jaise kaam karega.
🚀 2. Specific Script Run Karna
💡 Scenario: Tumhe sirf ek particular Nmap script chalana hai, jaise banner grabbing.
🔹 Command:
nmap –script=banner 192.168.1.1
🔹 Explanation:
✅ Yeh banner information lega jo service versions aur vulnerabilities detect karne me help karega.
🔍 3. Wildcard Script Execution
💡 Scenario: Tum ek particular category ke sabhi scripts run karna chahte ho, jaise HTTP related scripts.
🔹 Command:
nmap –script=http* 192.168.1.1
🔹 Explanation:
✅ Yeh sabhi HTTP-related scripts execute karega, jaise http-title, http-robots.txt, http-enum.
✅ Useful for web pentesting.
🔐 4. Brute Force Attack Scripts
💡 Scenario: Tum dekhna chahte ho ki kisi service ka password weak hai ya nahi.
🔹 Command:
nmap –script=ssh-brute -p 22 192.168.1.1
🔹 Explanation:
✅ Yeh script SSH ke passwords brute force karega.
✅ Wordlist specify karna hai to:
nmap –script=ssh-brute –script-args userdb=users.txt,passdb=passwords.txt -p 22 192.168.1.1
🔥 5. Vulnerability Detection Scripts
💡 Scenario: Tum SMB vulnerabilities (jaise EternalBlue) check karna chahte ho.
🔹 Command:
nmap -p445 –script smb-vuln* 192.168.1.1
🔹 Explanation:
✅ Yeh SMB ke sabhi vulnerabilities check karega.
✅ Agar system Windows 7 ya Server 2008 hai aur MS17-010 vulnerable hai, to exploit ho sakta hai.
🌐 6. DNS Bruteforcing (Subdomains Find Karna)
💡 Scenario: Tum kisi website ka hidden subdomains discover karna chahte ho.
🔹 Command:
nmap –script=dns-brute google.com
🔹 Explanation:
✅ Yeh admin.google.com, vpn.google.com, mail.google.com jaise subdomains find karega.
✅ Useful for recon phase me.
💣 7. SQL Injection Detection
💡 Scenario: Tum kisi website me SQL injection vulnerabilities check kar rahe ho.
🔹 Command:
nmap -p80 –script http-sql-injection scanme.nmap.org
🔹 Explanation:
✅ Yeh check karega ki website SQL Injection vulnerable hai ya nahi.
💡 8. Cross-Site Scripting (XSS) Detection
💡 Scenario: Tum XSS vulnerabilities scan kar rahe ho.
🔹 Command:
nmap -p80 –script http-unsafe-output-escaping scanme.nmap.org
🔹 Explanation:
✅ Agar XSS filtering disabled hai, to yeh script detect karega.
🎭 9. Whois Lookup (Website Information Find Karna)
💡 Scenario: Tumhe kisi domain ka Whois information chahiye.
🔹 Command:
nmap –script=whois* google.com
🔹 Explanation:
✅ Yeh Whois database se domain owner, IP ranges, registrar ka data nikalega.
📂 10. Custom Scripts Banana (Apna NSE Script Likho)
💡 Scenario: Tumhe apni custom script likhni hai aur usko run karna hai.
🔹 Path:
/usr/share/nmap/scripts/custom-script.nse
🔹 Example Custom NSE Script:
description = [[
Yeh script ek simple port banner grab karega.
]]
author = “HackerX”
license = “Same as Nmap–See https://nmap.org/book/man-legal.html”
categories = {“discovery”}
portrule = function(host, port)
return port.state == “open”
end
action = function(host, port)
return “Port “ .. port.number .. ” is open!”
end
🔹 Run Karne Ke Liye:
nmap –script=/usr/share/nmap/scripts/custom-script.nse 192.168.1.1
🛠 Nmap Scripts Ko Update Kaise Kare?
Agar tumhe latest NSE scripts chahiye to Nmap scripts ko update karna zaroori hai.
🔹 Command:
nmap –script-updatedb
🔹 Explanation:
✅ Yeh new scripts download aur existing scripts ko update karega.
🛡 Summary
✅ Nmap ke scripts pentesting me bohot useful hote hain:
Vulnerability scanning (SMB, SQLi, XSS, etc.)
Brute force attacks (SSH, RDP, FTP, etc.)
Reconnaissance (DNS brute force, Whois lookup, etc.)
Custom scripts likh sakte ho jo automation me help kare
Nmap ke sabhi important flags ke explanation ke saath ek detailed table yaha hai:
| Flag | Use | Example | Scenario |
|---|---|---|---|
| -sS | Stealthy SYN Scan (Half-Open Scan) | nmap -sS target.com | Jab aap bina detect hue scanning karna chahte hain, IDS bypass karne ke liye. |
| -sT | TCP Connect Scan (Normal) | nmap -sT target.com | Jab aapke pass root privileges na ho, ya firewall open connections ko detect kar raha ho. |
| -sU | UDP Scan | nmap -sU target.com | Jab UDP-based services (DNS, SNMP, DHCP) ka pata lagana ho. |
| -sV | Service Version Detection | nmap -sV target.com | Jab kisi open port par chalne wale exact service version ki jankari leni ho. |
| -sC | Default Script Scan | nmap -sC target.com | Common vulnerability checks ke liye jo Nmap NSE scripts use karta hai. |
| -A | Aggressive Scan (OS, Version, Script, Traceroute) | nmap -A target.com | Jab complete information chahiye ek hi scan me (OS, services, scripts, aur traceroute). |
| -O | OS Detection | nmap -O target.com | Jab kisi system ka operating system identify karna ho. |
| -p | Specific Port Scan | nmap -p 80,443 target.com | Jab sirf kuch particular ports ko scan karna ho (e.g., web server ports). |
| -p- | All 65535 Ports Scan | nmap -p- target.com | Jab kisi system ke sabhi open ports check karne ho. |
| -F | Fast Scan (Few Common Ports) | nmap -F target.com | Jaldi scan karne ke liye sirf common ports ko check karta hai. |
| -T0 to -T5 | Timing Template (Speed Control) | nmap -T4 target.com | Jab scan speed aur stealth control karna ho (T0 slowest, T5 fastest). |
| -Pn | No Ping, Direct Scan | nmap -Pn target.com | Jab host ICMP ping ko block kar raha ho aur directly scan karna ho. |
| -n | No DNS Resolution | nmap -n target.com | Jab aapko DNS lookup se bachna ho aur sirf IP scan karna ho. |
| -v | Verbose Output | nmap -v target.com | Jab scanning progress aur details ko dekhna ho. |
| -vv | Extra Verbose Output | nmap -vv target.com | Jab aur bhi zyada detailed output chahiye ho. |
| -oN | Save Output in Normal Format | nmap -oN result.txt target.com | Jab scan result ko plain text file me save karna ho. |
| -oX | Save Output in XML Format | nmap -oX result.xml target.com | Jab automated tools ke liye structured XML output chahiye. |
| -oG | Save Output in Grepable Format | nmap -oG result.txt target.com | Jab result ko parsing ya automation ke liye grep-friendly format me chahiye. |
| – -script | Run NSE Script | nmap – -script=http-title target.com | Jab kisi specific vulnerability ya information gathering NSE script run karni ho. |
| -D | Decoy Scan (Spoofed IPs) | nmap -D RND:10 target.com | Jab IDS/IPS bypass karne ke liye fake IPs ke sath scan karna ho. |
| -S | Spoof Source IP | nmap -S 192.168.1.100 target.com | Jab source IP spoofing karna ho, firewall bypass ke liye. |
| -e | Use Specific Network Interface | nmap -e eth0 target.com | Jab multiple network interfaces ho aur kisi specific interface se scan karna ho. |
| -f | Fragmented Packets (Bypass Firewalls) | nmap -f target.com | Jab firewall TCP packet fragmentation ke basis par block kar raha ho. |
| – -mtu | Set Custom MTU Size | nmap – -mtu 32 target.com | Jab IDS/IPS ko evade karne ke liye MTU size modify karna ho. |
| -r | Scan Ports Sequentially | nmap -r target.com | Jab ports ko random order me scan na karke sequentially scan karna ho. |
| – -top-ports | Scan Most Common Ports | nmap – -top-ports 100 target.com | Jab sabse common 100 ports ko scan karna ho. |
| – -disable-arp-ping | Disable ARP Ping Scan | nmap – -disable-arp-ping target.com | Jab kisi LAN environment me ARP ping scanning disable karni ho. |
Q1: Nmap kya hai?
Nmap (Network Mapper) ek open-source network scanning tool hai jo network reconnaissance aur security auditing ke liye use hota hai. Iska istemal kisi bhi system ke open ports, running services, OS detection aur vulnerability scanning ke liye kiya jata hai.
Q2: Nmap ka full form kya hai?
Nmap ka full form Network Mapper hai.
Q3: Nmap kis layer par kaam karta hai?
Nmap Transport Layer (Layer 4) aur Network Layer (Layer 3) par kaam karta hai. Ye TCP, UDP, ICMP packets ka use karke scanning karta hai.
Q4: Nmap ke use cases kya hain?
Nmap ka use kai security aur networking tasks me hota hai, jaise:
- Network Discovery – Kisi network me active hosts aur devices ka pata lagana.
- Port Scanning – Open ports aur unke services ka detection.
- OS Detection – Target machine ka Operating System identify karna.
- Service Version Detection – Kisi port par chalne wale software ka version nikalna.
- Vulnerability Assessment – Security loopholes aur misconfigurations find karna.
Q5: Nmap me kaun-kaun se scanning techniques use hoti hain?
Nmap me multiple scanning techniques hoti hain:
- SYN Scan (
-sS) – Stealthy scan jo IDS/IPS ko bypass karne me madad karta hai. - TCP Connect Scan (
-sT) – Normal scan jo full TCP handshake complete karta hai. - UDP Scan (
-sU) – UDP-based services (DNS, SNMP) scan karne ke liye. - Aggressive Scan (
-A) – OS detection, script scanning aur traceroute ek sath karta hai. - Ping Scan (
-sn) – Sirf active hosts find karne ke liye.
- SYN Scan (
Q6: Nmap me -sS aur -sT scan me kya difference hai?
| Feature | SYN Scan (-sS) | TCP Connect Scan (-sT) |
|---|---|---|
| Working | Half-open TCP handshake karta hai. | Full TCP handshake complete karta hai. |
| Stealthy? | Haan, IDS detect nahi kar pata. | Nahi, easily detect ho jata hai. |
| Permissions | Root privileges chahiye. | Root privileges ki zarurat nahi. |
| Speed | Fast | Slow |
| Usage | Jab stealthy scan chahiye ho. | Jab root access available nahi ho. |
Q7: Nmap me -A flag ka kya kaam hai?
-A flag aggressive scanning ke liye hota hai jo multiple cheezein ek sath detect karta hai:
- OS Detection
- Service Version Detection
- Script Scanning
- Traceroute
Example:
nmap -A target.com
Q8: Nmap ke alternative tools kaun se hain?
Agar Nmap available na ho to kuch alternative tools hain:
- Masscan – Bahut fast port scanning tool.
- Zmap – Large-scale network scanning ke liye.
- Angry IP Scanner – Simple graphical scanner.
- Hping3 – Advanced packet crafting aur scanning ke liye.
Q9: Nmap se kisi specific port ko kaise scan kar sakte hain?
Agar sirf ek ya kuch specific ports scan karne ho to -p flag use hota hai:
Example:
Is command se sirf SSH (22), HTTP (80), aur HTTPS (443) ports scan honge.
Agar sabhi 65535 ports scan karne ho to:
Q10: Nmap scan ka result kis format me save kar sakte hain?
Nmap scan ka result multiple formats me save kiya ja sakta hai:
-
- Normal Format (-oN)nmap -oN result.txt target.com
- XML Format (-oX)nmap -oX result.xml target.com
- Grepable Format (-oG)nmap -oG result.txt target.com
- All Formats Ek Sath (-oA)nmap -oA result target.com
- Normal Format (-oN)
Q11: Nmap me OS detection kaise hota hai?
Nmap OS detection ke liye TCP/IP fingerprinting ka use karta hai. Ye different network packets ke response analyze karta hai aur unse OS ( Operating System ) guess karta hai.
Command:
nmap -O target.com
Agar OS detection aur accurate chahiye to:
Example Output:
Q12: Nmap scripts kya hoti hain? NSE kya hai?
NSE (Nmap Scripting Engine) ek powerful feature hai jo Nmap ke saath aata hai. Ye pre-built scripts ka use karke vulnerability scanning, brute force attack detection, malware analysis jaise tasks karta hai.
Example:
Ye command target par common vulnerabilities check karega.
Agar kisi specific service ke against script run karni ho:
Ye command target ke HTTP title ko fetch karega.
Q13: Nmap firewall bypass karne ke liye kaun kaun se techniques use karta hai?
Firewalls aur IDS/IPS systems ko bypass karne ke liye Nmap me kai advanced techniques hain:
| Technique | Command | Use Case |
|---|---|---|
| Decoy Scan | nmap -D RND:10 target.com | Multiple fake IPs ke sath scan karna. |
| Fragmentation Scan | nmap -f target.com | Packet fragmentation se detection bypass karna. |
| Source Port Manipulation | nmap –source-port 53 target.com | DNS port se scan karke firewall evade karna. |
| IP Spoofing | nmap -S 192.168.1.100 target.com | Fake source IP se scan karna. |
| Idle Scan | nmap -sI zombieIP target.com | Third-party system ka use karke scan karna. |
Q14: Nmap ka kaunsa scan sabse stealthy hai?
Sabse stealthy scan SYN Scan (-sS) hota hai kyunki ye TCP handshake complete nahi karta. Is wajah se IDS/IPS ko ye detect karna mushkil hota hai.
Example:
nmap -sS target.com
Agar aur bhi stealthy scan chahiye to timing slow karke:
nmap -sS -T0 target.com
(T0 paranoid mode hai, jo extreme stealth provide karta hai.)
Q15: Nmap me -Pn aur -sn flags me kya difference hai?
| Flag | Use | Example |
|---|---|---|
| -Pn | Host discovery disable karta hai aur seedha scan karta hai. | nmap -Pn target.com |
| -sn | Sirf ping scan karta hai, ports scan nahi karta. | nmap -sn target.com |
Use Case:
- -Pn tab use hota hai jab firewall ICMP aur TCP ping ko block kar raha ho.
- -sn tab use hota hai jab sirf active hosts detect karne ho.
Q16: Nmap me -T0 se -T5 timing options ka kya kaam hai?
Ye flags scan ki speed aur stealth control karne ke liye hote hain.
| Timing Flag | Speed | Stealth | Use Case |
|---|---|---|---|
| -T0 | Bahut Slow | Maximum | IDS evade karne ke liye |
| -T1 | Slow | High | Honeypot detection avoid karne ke liye |
| -T2 | Medium-Slow | Medium | Normal scan ke liye |
| -T3 | Normal | Low | Default scan speed |
| -T4 | Fast | Very Low | Fast scanning ke liye |
| -T5 | Very Fast | No Stealth | Jab stealth important na ho |
Example:
nmap -T4 -sS target.com
(Ye fast aur efficient scan karega.)
Q17: Nmap ke result ko filtering aur analysis ke liye kaise use kar sakte hain?
Nmap ke output ko aur refine karne ke liye Grep aur awk jaise commands ka use kar sakte hain.
Example:
-
-
- Sirf open ports dekhne ke liye:nmap -p- target.com | grep “open”
- Sirf running services filter karne ke liye:nmap -sV target.com | grep “Service”
- XML output ko HTML report me convert karna:xsltproc result.xml -o report.html
(Ye XML output ko ek achhi HTML report me convert karega.)
- Sirf open ports dekhne ke liye:
-
