NGINX – Zero Se Hero Tak: Ek Ultimate Guide Beginner Se Lekar Advanced Mastery Tak

Introduction to Nginx :
Nginx ek powerful aur efficient web server hai jo aaj kal ke modern web infrastructure mein kaafi use hota hai. Traditional web servers jaise ki Apache multi-threaded architecture use karte hain, lekin Nginx ek non-threaded, event-driven architecture pe kaam karta hai. Iska matlab ye hai ki Nginx ek saath bahut saare connections handle kar sakta hai, isiliye ye high-traffic websites ke liye perfect choice hai.
Nginx sirf static web pages serve karne tak hi limited nahi hai. Ye kaafi versatile hai — ise aap load balancer, HTTP cache, ya reverse proxy ke roop mein bhi configure kar sakte ho. In sab features ki wajah se Nginx kaafi complex aur large-scale web architectures ka core part ban gaya hai.
Forward Proxy vs. Reverse Proxy :
Nginx ka reverse proxy ke roop mein kya role hai ye samajhne ke liye, sabse pehle humein forward proxy aur reverse proxy ke beech ka difference samajhna zaroori hai.
Forward Proxy:
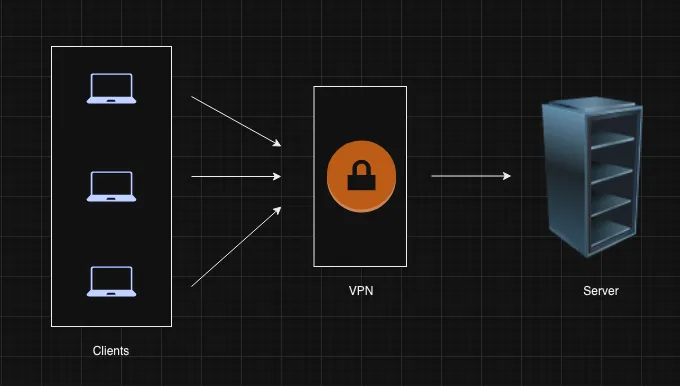
Normal HTTP connection mein, client (jaise browser) directly server ko request bhejta hai. Lekin jab forward proxy (jaise VPN) ka use hota hai, to client apni request pehle proxy server ko bhejta hai, aur fir proxy us request ko actual server tak forward karta hai. Is case mein, server ko original client ke baare mein kuch nahi pata hota — wo sirf proxy server se deal karta hai.
Ye setup mainly tab use hota hai jab privacy maintain karni ho ya phir geo-restrictions ko bypass karna ho (jaise kisi blocked website ko access karna).
Reverse Proxy :
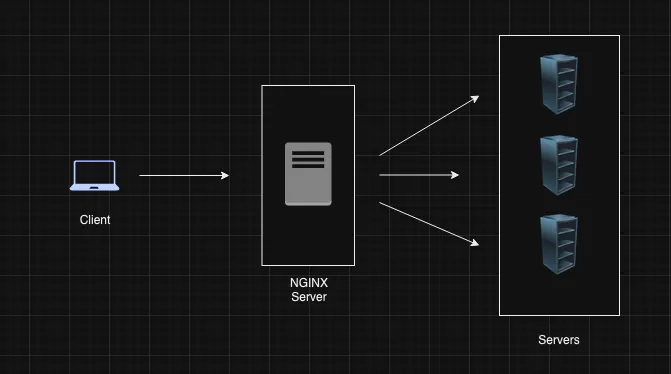
Iske opposite, reverse proxy client aur multiple servers ke beech mein hota hai. Client apni request reverse proxy ko bhejta hai, aur fir reverse proxy decide karta hai ki kaunsa server us request ko handle karega.
Client ko ye nahi pata hota ki actual mein uski request kaunse server ne process ki hai.
Nginx reverse proxy ke liye ek popular choice hai kyunki ye kaafi efficient aur flexible hai.
For example :
Maan lo:
/adminwali requests Server 1 pe bheji ja sakti hain./settingswali requests Server 2 pe ja sakti hain.
Nginx is type ki routing ko bahut efficiently handle karta hai. Ye ensure karta hai ki har request ko predefined rules ke basis pe sahi server tak bheja jaaye.
Advantages of Nginx :
Nginx ke kuch major faayde hain jo ise bahut saare web projects ke liye preferred choice banate hain:
High Concurrency: Nginx ek saath 10,000+ concurrent requests handle kar sakta hai, bina performance ke compromise ke.
HTTP Caching: Ye HTTP requests ko cache kar sakta hai, jis se server load kam hota hai aur response time improve hota hai.
Reverse Proxy: Nginx reverse proxy ke roop mein kaam karta hai, jahan client requests ko sahi server tak route kiya jaata hai.
Load Balancing: Ye incoming requests ko multiple servers ke beech distribute karta hai, taaki kisi ek server pe zyada load na aaye.
API Gateway: Nginx API gateway ki tarah bhi kaam kar sakta hai, jo API requests ko manage aur route karta hai.
Static File Serving: Ye static files jaise images aur videos ko efficiently serve aur cache karta hai.
SSL Termination: Nginx SSL certificates ko handle karta hai, taaki users ko secure connection mil sake.
🔹 1. High Concurrency
Use Case:
Maan lo Flipkart pe Big Billion Sale chal rahi hai aur lakhon users ek saath site open kar rahe hain. Agar server har user ke liye alag thread banata, to wo crash ho jaata.
Nginx, apne event-driven model ke wajah se, thousands of connections ko lightweight tareeke se handle karta hai — bina crash hue.
🔹 2. HTTP Caching
Use Case:
Ek news website par daily same headlines hoti hain. Har baar server se data laane ke bajaye, Nginx cache bana deta hai.
Result? Server pe load kam, aur user ko lightning-fast response.
🔹 3. Reverse Proxy
Use Case:
Ek company ke paas multiple backend services hain — ek admin panel, ek user dashboard.
User jab request karta hai /admin, to Nginx usse admin server pe bhejta hai, aur /dashboard ko dashboard server pe — user ko pata bhi nahi chalta ke peeche kya chal raha hai.
🔹 4. Load Balancing
Use Case:
Maan lo ek e-commerce site ke paas 3 backend servers hain. Agar saari traffic ek hi server pe chali gayi to wo hang ho jaayega.
Nginx requests ko teeno servers mein distribute karta hai — taaki load sabke beech equally ho.
🔹 5. API Gateway
Use Case:
Ek mobile app hai jisme login, payments, products — sab alag-alag microservices se handle hote hain.
Nginx API Gateway ki tarah kaam karke, har endpoint ko right microservice tak pahuchaata hai (e.g., /login → Auth Service, /pay → Payment Service).
🔹 6. Static File Serving
Use Case:
Jab koi website user ko images, CSS, ya JS files serve karti hai, to backend ko baar-baar disturb karna inefficient hota hai.
Nginx directly ye static files serve karta hai, wo bhi high speed ke saath.
🔹 7. SSL Termination
Use Case:
HTTPS connection secure hota hai, lekin har server pe SSL setup costly aur complex ho sakta hai.
Nginx ek jagah SSL handle karta hai (SSL termination), aur aage servers se normal HTTP mein baat karta hai.
Result? Secure bhi, simple bhi.
Installation and Setting Up Nginx
Using Docker:
Is section mein hum Nginx ko Docker ke through install aur setup karna sikhenge, uski configuration karenge, aur ek sample project bhi setup karenge.
Step 1: Installing Nginx with Docker
Agar aap Nginx ko Docker container ke andar install karna chahte ho, to ye steps follow karo:
docker run -it -p 8080:80 ubuntu
Ye command ek Ubuntu container start karti hai, jisme host machine ka port 8080 container ke port 80 se map kiya jaata hai.
Iska matlab: Jab aap browser mein localhost:8080 open karoge, to wo container ke andar ke port 80 pe jaayega — jahan hum Nginx chalane wale hain.
* Ab next step yeh hai ki package list ko update karo aur Nginx install karo:
apt-get update
apt-get install nginx
* Installation check karne ke liye yeh command run karo:
nginx -v
2. Host Machine par:
sudo apt update
sudo apt install nginx
* Installation ke baad, aap Nginx ko start kar sakte ho.
sudo systemctl start nginx
* Status check karne ke liye.
sudo systemctl status nginx
Nginx Configuration Basics
Nginx ka main configuration file hai nginx.conf. Yeh generally /etc/nginx/nginx.conf path pe hota hai. Ab hum ek simple Nginx configuration file ko samajhte hain:
worker_processes auto;
events {
worker_connections 1024;
}
http {
include mime.types;
default_type application/octet-stream;
sendfile on;
keepalive_timeout 65;
server {
listen 80;
server_name localhost;
location / {
root /usr/share/nginx/html;
index index.html index.htm;
}
}
}
Ab har part ko samajhte hain:
worker_processes auto;
Yeh directive Nginx ko batata hai ki kitne worker processes start karne hain. Worker processes ka kaam requests ko handle karna hota hai. Agar yeh
autope set hai, toh Nginx apne CPU cores ke basis pe optimum number of processes decide karega.events { worker_connections 1024; }
Yeh block connection handling settings ko define karta hai.
worker_connections 1024; ka matlab hai ki har worker process 1024 simultaneous connections handle kar sakta hai. Agar 4 worker processes hain, toh 4096 connections ek saath handle ho sakte hain.
http { … }
Yeh block HTTP requests ko handle karne ke liye settings define karta hai. Yaha par most of your web server configuration hota hai.
include mime.types;
Yeh directive Nginx ko mime.types file include karne ke liye kehta hai, jo file extensions ko MIME types se map karta hai. MIME types browser ko yeh batate hain ki kisi file ko kaise handle karna hai (e.g., .html ko text/html ke roop mein, .jpg ko image/jpeg ke roop mein).default_type application/octet-stream;
Agar Nginx kisi file ka MIME type determine nahi kar pata, toh yehapplication/octet-streamdefault type use karta hai, jo usually “download this file” ka matlab hota hai.sendfile on;
Yeh directivesendfilesystem call ko enable karta hai, jo Nginx ko files serve karne mein zyada efficiently kaam karne mein madad karta hai.keepalive_timeout 65;
Yeh setting batati hai ki idle connection ko kitni der (seconds mein) open rakhna hai, jab tak ki Nginx usse close nahi kar de. Default value 65 seconds hoti hai.
server { … }
Yeh block virtual server ki configuration define karta hai, jo kisi specific domain ya IP address pe requests handle karega.
listen 80;
Yeh Nginx ko batata hai ki HTTP requests ko port 80 par sunna hai. Port 80 HTTP ka default port hota hai.server_name localhost;
Yeh directive batata hai ki yeh server block kis domain name ke liye response karega.localhosttypically local testing ke liye hota hai, lekin real-world scenario mein aap ise apne domain name (e.g., example.com) se replace karenge.location / { … }
Yeh block define karta hai ki Nginx ko kis tarah se alag-alag request URIs ka response dena hai./ka matlab hai ki yeh block root URL (e.g., http://localhost/) ke liye handle karega.root /usr/share/nginx/html;
Yeh directive batata hai ki Nginx ko kis directory mein files dikhani hain. Yaha default directory/usr/share/nginx/htmlhoti hai, jahan Nginx HTML files store karta hai.index index.html index.htm;
Yeh directive batata hai ki agar directory request kiya jaye, toh Nginx kin files ko sabse pehle dekhega. For example, agar user http://localhost/ par jata hai, toh Nginx sabse pehleindex.htmlyaindex.htmfile ko serve karne ki koshish karega.
Configuring Nginx
Jab Nginx install ho jata hai, ek directory /etc/nginx/ ban jaati hai. Is directory mein sabse important file hoti hai nginx.conf, jo Nginx ki main configuration file hai.
Sabse pehle, original nginx.conf ko backup karo:
mv /etc/nginx/nginx.conf /etc/nginx/nginx-backup.conf
Ab, aap vim jaise text editor ka use karke naya nginx.conf file bana sakte ho:
vim /etc/nginx/nginx.conf
Is file mein aap apni Nginx configuration define karenge. Yeh ek simple example hai:
events {
}
http {
server {
listen 80;
server_name _; # Yeh ka matlab hai ki yeh kisi bhi server name pe respond karega
location / {
return 200 “Hello from Nginx Conf File”;
}
}
}
Configuration edit karne ke baad, aapko Nginx ko reload karna hoga changes apply karne ke liye:
nginx -s reload
Setting Up a Basic Website with Nginx
Ab jab hum Nginx ke baare mein basic samajh chuke hain, toh ek simple project banate hain uski capabilities ko demonstrate karne ke liye.
Create a Project Directory:
mkdir -p /www/data
echo “<h1>Welcome to Nginx</h1>” > /www/data/index.html
Nginx ko configure karo:
nginx.conf ko update karke /www/data directory point karwao:
server {
listen 80;
server_name localhost;
root /www/data;
location / {
try_files $uri $uri/ =404;
}
}
Nginx ko reload karo:
nginx -s reload
Website access karo:
Apne browser mein jaake http://localhost:8080 open karo. Aapko “Welcome to Nginx” ka message dikhai dega.
Let’s Understand Some of the Most Used Blocks of NGINX:
Nginx apne configuration ko structure karne ke liye alag-alag blocks use karta hai. Teen sabse common blocks hain: server, location, aur upstream.
Server Block
Purpose: Ek specific domain ya IP address ke liye configuration define karta hai.
Example: Pehle wale basic configuration mein already cover ho chuka hai.
Location Block
Purpose: Specific request URIs ka response dena define karta hai.
Example:
location /images/ {
root /var/www/images;
}Upstream Block
Purpose: Load balancing ke liye backend servers ka group define karta hai.
Example:
upstream backend {
server backend1.example.com;
server backend2.example.com;
}
Reverse Proxy with Nginx
Ek reverse proxy client aur backend server ke beech mein hota hai, jo client requests ko backend server tak forward karta hai aur backend ka response client ko bhejta hai. Nginx ko reverse proxy ke roop mein configure karne ka tareeka yeh hai:
server {
listen 80;
server_name example.com;
location / {
proxy_pass http://backend_server;
proxy_set_header Host $host;
proxy_set_header X-Real-IP $remote_addr;
proxy_set_header X-Forwarded-For $proxy_add_x_forwarded_for;
}
}
proxy_pass http://backend_server;: Yeh Nginx ko batata hai ki requests ko backend server ko forward karna hai.
proxy_set_header Host $host;: Yeh ensure karta hai ki correct
Hostheader backend ko pass ho.proxy_set_header X-Real-IP $remote_addr;: Yeh client ka real IP address backend ko pass karta hai.
proxy_set_header X-Forwarded-For $proxy_add_x_forwarded_for;: Yeh client ka IP address
X-Forwarded-Forheader mein add karta hai, jo backend ko original client IP identify karne mein madad karta hai.
Load Balancing with Nginx
Nginx traffic ko multiple backend servers mein distribute kar sakta hai, taaki load balance ho sake.
upstream backend {
server backend1.example.com;
server backend2.example.com;
}
server {
listen 80;
server_name example.com;
location / {
proxy_pass http://backend;
}
}
upstream backend { ... }: Yeh backend servers ka group define karta hai.server backend1.example.com;: Backend group mein ek server add karta hai.proxy_pass http://backend;: Requests ko backend group ke kisi ek server ko forward karta hai.
Securing Nginx with SSL/TLS
SSL/TLS data ko encrypt karta hai aapke server aur clients ke beech. Nginx mein SSL configure karne ka tareeka:
server {
listen 443 ssl;
server_name example.com;
ssl_certificate /etc/nginx/ssl/example.com.crt;
ssl_certificate_key /etc/nginx/ssl/example.com.key;
location / {
root /var/www/html;
index index.html;
}
}
server {
listen 80;
server_name example.com;
return 301 https://$host$request_uri;
}
listen 443 ssl;: Nginx ko port 443 par SSL ke saath sunne ko keh raha hai (HTTPS ka default port).ssl_certificateaurssl_certificate_key;: Yeh aapke SSL certificate aur private key ke paths ko specify karta hai.return 301 https://$host$request_uri;: Sabhi HTTP requests ko HTTPS par redirect karta hai.
Advanced Nginx Configuration
Caching
Nginx backend se responses ko cache kar sakta hai taaki subsequent requests ka response time fast ho.
proxy_cache_path /var/cache/nginx levels=1:2 keys_zone=my_cache:10m max_size=1g inactive=60m;
proxy_cache_path: Caching ke liye directory aur settings define karta hai.levels=1:2: Cache ki directory structure ko define karta hai.keys_zone=my_cache:10m: Ek shared memory zone create karta hai, jiska naammy_cachehai aur memory 10MB hai.max_size=1g: Cache ka size limit 1GB set karta hai.inactive=60m: Agar cache items ko 60 minutes tak access nahi kiya gaya ho, toh unhe cache se hata deta hai.
Monitoring and Logging
Nginx sabhi requests aur errors ko log karta hai, jo troubleshooting aur monitoring ke liye zaroori hota hai.
log_format main ‘$remote_addr – $remote_user [$time_local] “$request” ‘
‘$status $body_bytes_sent “$http_referer” ‘
‘”$http_user_agent” “$http_x_forwarded_for”‘;
access_log /var/log/nginx/access.log main;
log_format main ...: Ek custom log format define karta hai jiska naammainhai.access_log /var/log/nginx/access.log main;: Access logs ko specified file mein store karta hai, jomainlog format ko use karta hai.
Common Errors
403 Forbidden: Usually matlab hai Nginx requested file ko access nahi kar paa raha hai.
500 Internal Server Error: Yeh aksar backend server mein problem ya Nginx ki misconfiguration ko indicate karta hai.
Conclusion
Nginx ek powerful aur versatile web server hai jo modern web infrastructure mein cornerstone ban gaya hai. Yeh pehle C10K problem (thousands of concurrent connections ko handle karne) ko solve karne ke liye bana tha, lekin ab yeh reverse proxy, load balancer, aur caching server jaise multiple purposes ke liye use hota hai. Iski lightweight architecture aur high performance ke wajah se Nginx duniya ke kuch bade aur high-traffic websites ka choice hai.
Jaise-jaise aap Nginx ko explore karte jayenge, aap dekhenge ki yeh sirf ek tool nahi hai, balki robust aur high-performance web services ko build aur manage karne mein ek fundamental part hai.
