Is action se humein ek image file milegi jiska naam hai “WindowsXP.jpg”, jo neeche dikhayi gayi hai.
Write-up: OhSINT TryHackMe
Yeh TryHackMe activity internet se information gather karne ke tareeqe sikhane ke baare mein hai, jise hum open-source intelligence gathering ya OSINT kehte hain. Isme tumhe yeh samajhne ko milega ke kaise social media, websites, aur dusre online sources se data collect aur analyse kiya jata hai.
Agar tum cybersecurity mein interested ho, toh OSINT ka use karna seekhna bahut zaroori hai — isse tum target ke baare mein kaafi kuch jaan sakte ho aur unki weaknesses identify kar sakte ho jo exploit ki ja sakti hain.
Is activity mein bas ek main task hai, lekin ise complete karne ke liye tumhe saat questions ke answers dene honge.
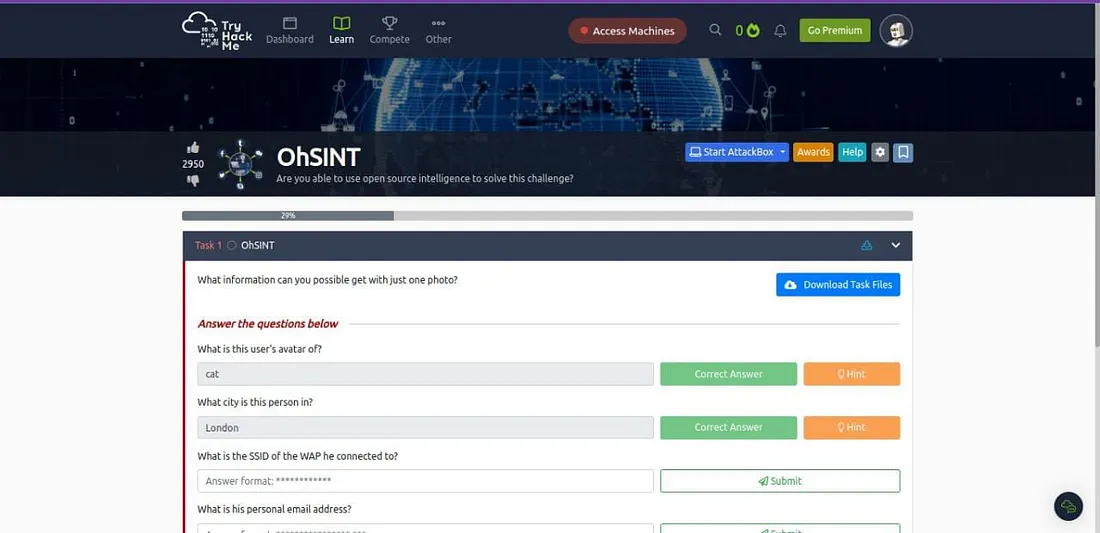
Shuru karne ke liye, humein Task Files download karni hongi. Bas Task 1 ke top par jo blue button hai jisme likha hai ‘Download Task Files’, uspar click karo — jaise neeche wali image mein dikhaya gaya hai.

Agar tum image ko dekho, toh lagega ke usme koi visible information nahi hai.
Lekin jab maine online search kiya, toh mujhe ek useful tool mila jiska naam hai ExifTool. Ye tool photographers, digital forensics experts, aur un logon ke liye kaafi popular hai jo digital files ke saath kaam karte hain. Ye file ke baare mein hidden metadata jaise ki creation time, edit time, aur location data wagairah ko dekhne aur manage karne mein help karta hai.
Is tool ko tum commands ke through ya ek user-friendly interface ke zariye use kar sakte ho. Kai aur applications bhi ExifTool ke saath integrate hoke kaam karti hain. Ye tool Phil Harvey ne banaya hai, aur tum isse TryHackMe ke Terminal mein use kar sakte ho.
Neeche screenshot mein diye gaye commands ko terminal mein run karke try karo.

Ab main ExifTool run karunga taake dekh sakun kya mujhe WindowsXP.jpg image ke baare mein koi interesting cheez milti hai ya nahi. Main neeche diya gaya command use karunga:

Is command se image ke hidden metadata jaise ki author, timestamp, GPS location, software used, ya kisi aur tarah ki embedded information nikal kar saamne aa sakti hai. Yeh OSINT investigation mein kaafi madadgar hota hai.
Is command ko chalane ke baad humein kuch interesting details milin. Humein pata chala ki image ke rights kis ke paas hain, aur image kahaan li gayi thi, jaise ki upar wali image mein dikh raha hai.
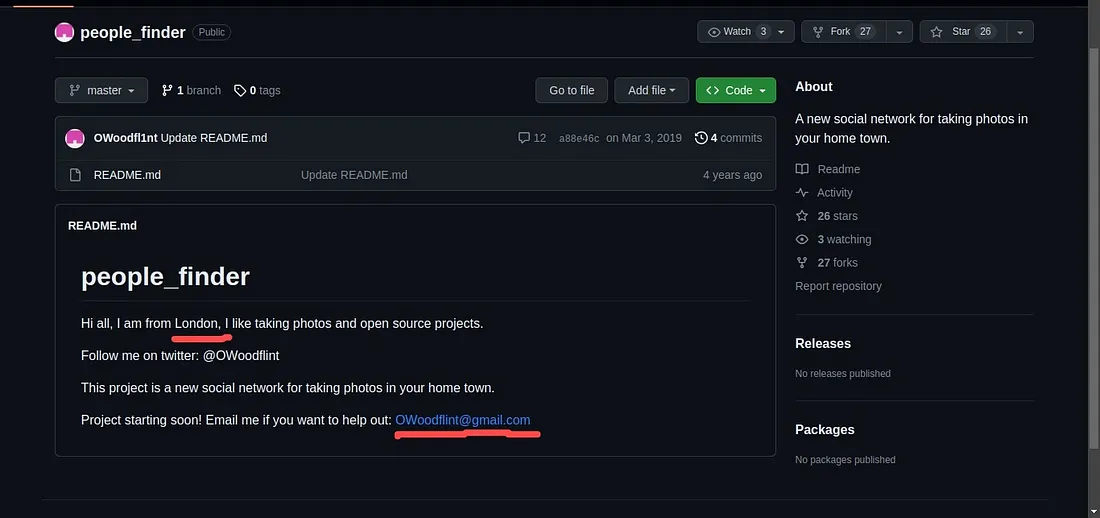
Jab humne Google par ‘OWoodflint’ ko search kiya, toh humein teen websites mili — ek Twitter, ek GitHub, aur ek WordPress pe. Tum in sabhi links ko neeche wali image mein dekh sakte ho.
Pehle question ka jawab dene ke liye ek hint bhi diya gaya hai jisme mention hai ki user ka koi social media account ho sakta hai. Toh sabse achha idea yeh hai ki tum Twitter profile ko check karo — waha se tum user ki profile picture ya aur bhi kaafi information nikal sakte ho.

Q.1 What is this user’s avatar of?
Ans: The user’s avatar is a cat.
Q.2 What city is this person in?
Ans: Jab humne GitHub profile open ki, toh humein pata chala ki yeh person London se hai. Neeche diye gaye screenshot mein tum dekh sakte ho.
Yeh kind of OSINT investigation yeh dikhata hai ki kaise chhoti chhoti details se hum kisi person ke baare mein useful information nikal sakte hain.
Q.3 What’s the SSID of the WAP he connected to?
Ans: Question mein diya gaya hint yeh batata hai ki BSSID aur Wigle.net ka use karke hum yeh jaan sakte hain ki person kis city mein hai.
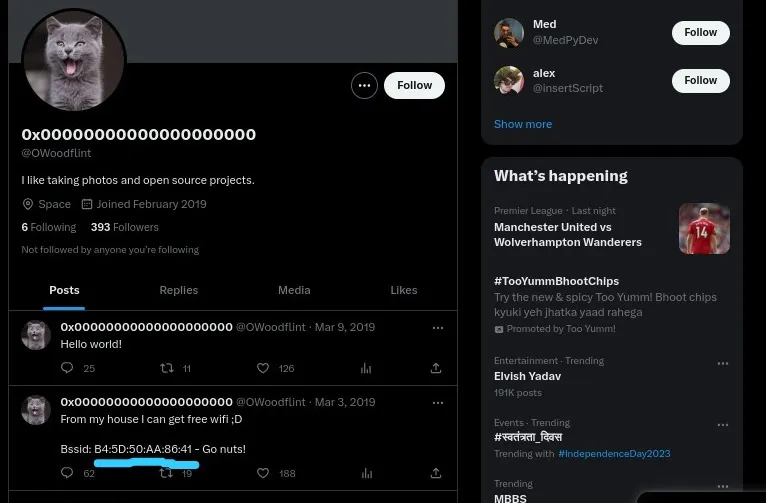
Agar tum Twitter link open karte ho jo pehle search ki gayi thi, toh tumhe ek tweet mein BSSID value milti hai:
Bssid: B4:5D:50:AA:86:41.
Neeche diye gaye screenshot mein tum yeh BSSID dekh sakte ho.
Isse tum Wigle.net par BSSID search karke yeh jaan sakte ho ki person kis SSID se connect hai.
Ab jab tumhare paas BSSID hai, tumhe Wigle.net par jana hoga aur wahan advanced search use karna hoga BSSID ke liye.
Steps follow karo:
Wigle.net par jao.
Network Characteristics section mein BSSID value daalo jo tumne Twitter se mili thi.
Phir Query button pe click karo.
Query karne ke baad tumhe BSSID ka result milega, jo neeche diye gaye screenshot mein dikhaya gaya hai. Is result se tum SSID aur uske connected network ki details dekh sakte ho.
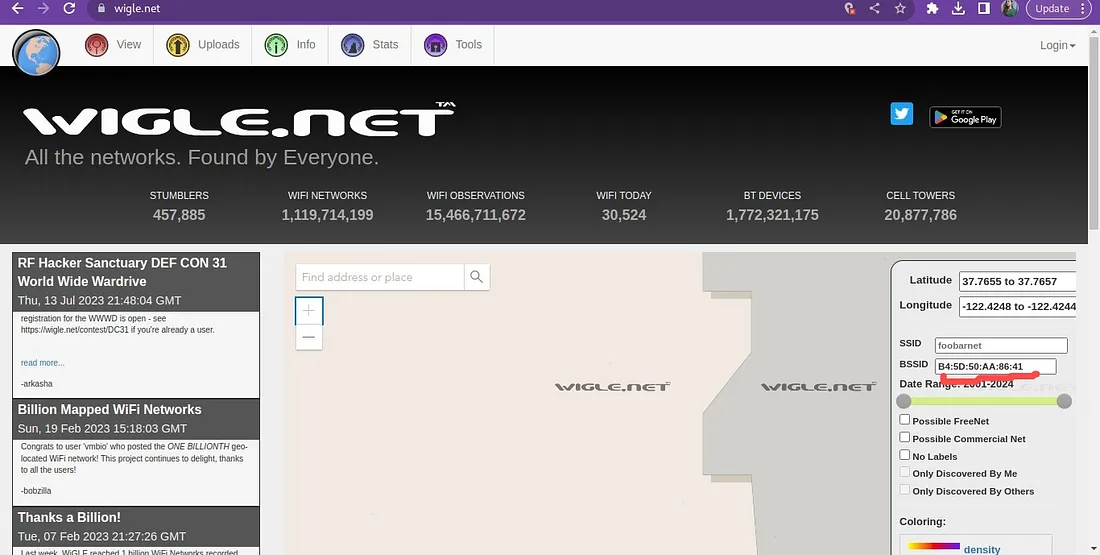
Ab, jo result tumhe mila usme map link pe click karo, aur tum us BSSID ka location dekh paoge. Toh, jo person hum dhund rahe hain, woh London mein based hai, jaise ki usne apne Twitter account par tweet mein mention kiya tha. SSID ka naam hai UnileverWiFi, jo tum BSSID se nikal sakte ho.
Q.4 What is his personal email address?
Ans: Uska personal email address hai OWoodflint@gmail.com, yeh uski GitHub page pe available hai: github.com/OWoodfl1nt/people_finder
Q.5 What site did you find his email address on?
Ans: GitHub
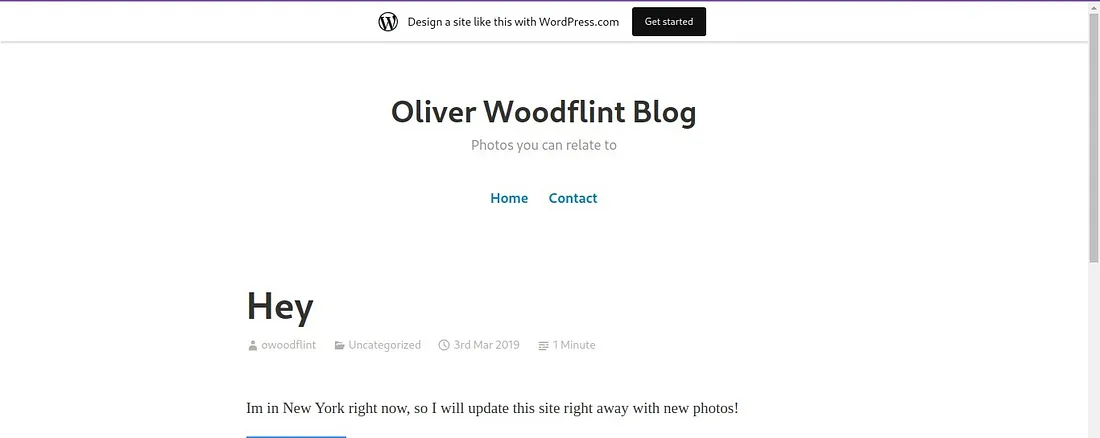
Q.6 Where has he gone on holiday?
Ans: Woh apni holiday pe New York gaya hai, jaise ki usne apne WordPress blog pe mention kiya tha: oliverwoodflint.wordpress.com/author/owoodflint/. Neeche diye gaye screenshot mein tum yeh dekh sakte ho.
Q.7 What is this person’s password?
Ans: Mujhe last question par dhyaan se sochna pada aur yeh samajhna tha ki password kaise mil sakta hai aur woh kis cheez ke liye use hota hai. Twitter aur GitHub page ko check karne ke baad kuch nahi mila, toh maine guess kiya ki WordPress Blog humara last chance ho sakta hai. Toh, maine decide kiya ki WordPress website ke code ko dekha jaaye. Jab maine code check kiya, toh humein ek ajeeb se characters ka set mila jo lag raha tha ki password ho sakta hai.
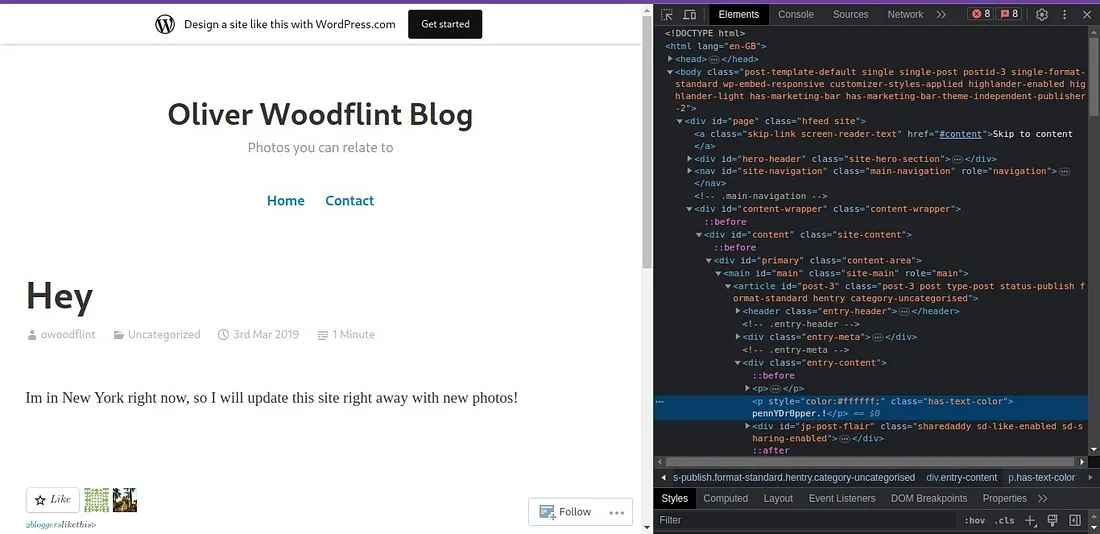
Kyunki password white font color mein likha hua tha, woh page par visible nahi tha. Lekin, maine “ctrl+a” use kiya sab kuch select karne ke liye aur page ka poora text highlight kar diya, tab woh password visible ho gaya.
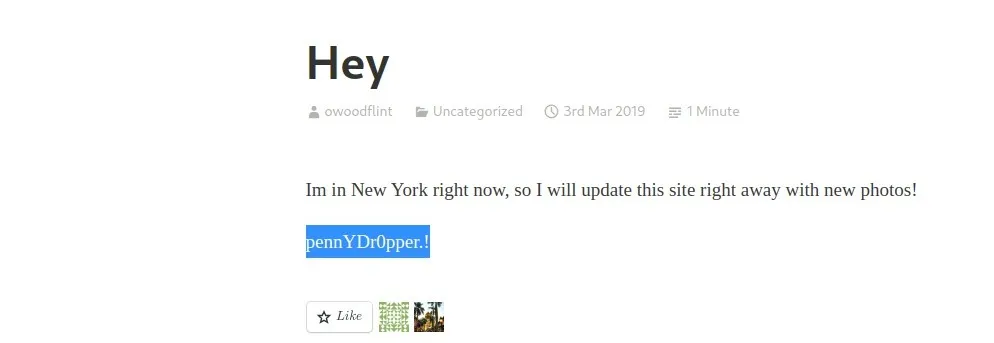
Toh, Answer hai “pennYDr0pper”.
